Monday, April 9, 2018

Vegetable (But... Chicken) Pot Pie

This is pot pie made out of half-used old fridge veggies and a jar of chicken fat. Sounds great, right?


Ready for some bad photos?? (My camera of ten years finally sort of kicked the bucket).

In this thing are potatoes, carrots, red pepper, onion, and some worth-their-weight-in-gold roasted chicken thigh drippings from an earlier meal. 

Gone in less than 24 hours.

Here's how to make it:

Start by dicing an onion, two medium carrots, one russet potato, and half a red pepper


Heat up some olive oil until shimmering, and add onions and carrots. Saute for five to seven minutes in the pot, before the pepper and potato join the party.


After the peppers and potatoes soften, add the chicken drippings. Much like in this recipe, I used leftovers from a dish at work: Middle Eastern roasted chicken thighs with cumin, whole garlic cloves, coriander, chili flakes, salt, and half a minced preserved lemon.

 You could easily pan-fry (skin-side down) a couple of small chicken thighs tossed in olive oil and those spices, and then add the rendered fat and shredded meat to the pie. 
I'd recommend:
1 teaspoon each of coriander and chili flakes
2 teaspoons cumin
1/2 teaspoon salt
4 whole garlic cloves
2 tablespoons minced preserved lemon


So, at this point, reduce the heat to medium-low and add a couple tablespoons of the fat (add any shredded meat later, if you're including it). Stir until the fat melts, and add an equal volume of flour.

My light really started fading around this time, btw


Stir in the flour until it thoroughly coats all the vegetables. Add about a cup of milk - you want it like a thick, creamy soup.


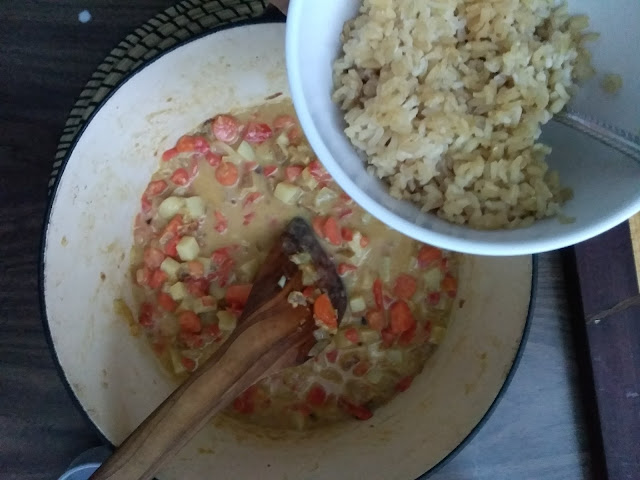
Once the milk is stirred in, turn off the heat. At this point, I added 1.5 cups of some leftover cooked brown rice I had in the fridge. Any sort of cooked grain will work. Stir until combined.


After the rice is incorporated, add any shredded meat you'd like (I'm just working with chicken fat, so I didn't add any). 
Now for the dough! I'm using a standard, unsweetened and butter-based pie dough:

1 part salted butter
2 parts flour
A few tablespoons of water

Place frozen cubes of butter into a pile of flour


Pinch and tear apart the cubes with your hands (or cut with a pastry cutter or two knives) until the butter pieces are the size of large peas (not chickpeas. Green peas.)

Add a tablespoon of very cold water at a time to the mix of butter and flour. Toss the mix with your hands, instead of kneading, until it begins to clump together in large, shaggy pieces.

Press the clumps together, fold the resulting mass in half, and press down with the heel of your hand. Repeat a couple of times, until the mass stays together and very little loose flour remains. It should look a bit like this:

.....................................................................................
If this is all too much, I have a cheat for you. My family has used this recipe for years. It's oil-based, and makes a crisp, flaky crust that is great for using with fillings that don't collapse in height. If you're making fruit pies, use a butter-based crust, because the crust will stay WITH the filling as it reduces in the oven.

This recipe will create one pie crust. Double this if you want a top AND bottom crust.

1/2 cup vegetable oil 
1/4 cup milk
2 cups flour 
1/2 tsp salt

Mix the dry and wet ingredients separately. Pour the wet into the dry all at once and stir quickly, stopping when the dough is just combined and still crumbly. Knead with your hands until there are no crumbs left, and then roll out quickly between two nonstick surfaces, like parchment, plastic wrap, or silpats. Use as soon as possible, since waiting will cause the dough to dry out and separate.
BAM, pie crust. Enjoy!
................................................................................................
Anyway, back to the butter crust.

Roll out your pressed-together mass (flipping and flouring both sides if needed) until its diameter is slightly larger than that of the pot.


I folded this circle into quarters, placed the dough right on top of the filling, and unfolded it, tucking the ragged edges under where they meet the pot sides.

Brush the top of the dough with milk and poke some holes in it with a fork or knife. Bake at 425 degrees for half an hour, or until the filling is bubbling and the crust is cracked and brown.

Monday, February 12, 2018

Cardamom-Pistachio Carrot Tart

A few days ago, I made this:


Cardamom-pistachio frangipane with maple-roasted carrots on top. Kinda weird, right? But it tastes freaking great.

I love the concept of frangipane. Sort of a cross between baked custard and soft cookies, it's traditionally made with almonds, but it can modified with any kind of nut or flavourful grain. It can be the star of a dish, or the supporting act. Usually, it's in shallow tarts as the base for baked fruit. There's often a pastry crust, but I decided to forego that in favour of fewer steps. 

Here's what I mean: Kitchen Vignettes' almond and plum tart. Crustless, buttery, and just as important as the fruit it surrounds. Bojon Gourmet's ridiculously beautiful almond and rhubarb tart, or her walnut and apple galette, which is equally stunning. The frangipane in these desserts is essential, but the fruit is the real focus. I wanted to flip that around and concentrate on the cookie.

Sooo here: pistachios, cardamom, and rainbow carrots. (I used Bojon Gourmet's almond frangipane recipe above, subbing in pistachios for almonds).


Cardamom pods pounded and seeds ground, nuts pulverized, and carrots sliced.


 Carrots get tossed with olive oil, maple syrup, and a bit of salt.


And roasted for 15 minutes at 350.


Carrots in the oven, onto the frangipane. Butter and sugar.


Whisked up,


And about a cup and a half of ground pistachios, plus...


two eggs,


and some flour, 1/2 tsp salt, and 1 tsp ground cardamom.


Bam! Cardamom-pistachio frangipane.


Into a parchment-lined pan, aaaaand maple-roasted carrots go on top.


Just filling in the edges here...


After 30 minutes in the oven at 350, it honestly doesn't look as pretty as I wanted. Next time I think I'll slice the carrots thicker and possibly steam them instead of roasting so they don't curl. 


But damn is cardamom-pistachio frangipane amazing. The spice comes through so much better than in cake recipes I've made, possibly because there's a higher ratio of fat to other ingredients. And the carrots add enough of their own flavour to be noticeable, but they don't steal the show. 


So yeah, if you can't decide between cake or cookies for dessert, this is a good bet. 


Saturday, February 3, 2018

Beet Gnocchi, Revisited

By now, I've made gnocchi countless times. 


In tomato sauces, with pesto, or simply seared in brown butter with garlic.
(First gnocchi I ever made, in 2012, right below)


I've had to make potato gnocchi for both my food industry jobs, so I feel pretty confident when it comes to that version.

Beet gnocchi, however, is something else. My first attempt (circa 2015, I think) wasn't bad, if a little lumpy:


Then there was a sharp downturn in success when I tried to use grated candystripe (or Choggia) beets in my next batch in this post. Results below.


They were pretty gummy and what colour there was boiled out of most of them during cooking.

But I'm getting closer. This time, I used the more popular, dark-red beets (Detroit Dark Reds or similar variety). After roasting whole at 400 for about an hour, I peeled, chopped, and then processed the beet flesh into a purée with my handheld immersion blender. 

The below dough is about a half pound of puréed beets, two whole eggs, and enough flour to make the (very wet) mix stop spreading across the counter. 


It's hard to know by feel when to stop adding flour. I generally keep kneading it in until I can fold the dough in half, and the mound remains at the same height, instead of slumping back down into a puddle. 

A tip I learned from my current job involves taking a fingertip-sized piece of dough and dropping it into boiling water. If, after 15 seconds or so, the dough ball still holds together, the dough has enough flour. 

After I've reached that point, I roll half-inch-wide and 8-inch-long logs of dough, and cut them into half-inch-wide pieces. Then I press them into the back of a fork to make the traditional gnocchi lines.


I found this video to be really helpful with getting the impressions right.


Whenever I make gnocchi, I save a couple handfuls to have fresh, and freeze the rest.  

 Placed on baking sheets lined with parchment or plastic, and frozen for minimum four hours, they can be kept in an airtight container in the freezer for at least two months. That's the longest I've ever made it without devouring them, so they might keep longer. 


You can eat these in so many ways. Today, I made Seared Beet Gnocchi with Fennel, Garlic, and Feta. 

First, clean out the pot.


Then, add olive oil and start it on a low heat while simultaneously heating up a different pot of water on high. 

Meanwhile, thinly slice two cloves of garlic, a quarter of a fennel bulb, and a handful of parsley. When the water simmers, throw the garlic into the warm oil. 


After the garlic is soft, add the fennel and turn the heat to medium-high. While that's on a back burner, get the gnocchi. I made the above batch of beet gnocchi a little while ago, so I'm working with frozen. I'd say it's about a half-pound.


The light in my kitchen isn't great, so I'm putting the gnocchi in the water in front of my really big window. Don't do that - you want the water at a rolling boil. 


Colour will immediately start to leach from the gnocchi, but don't worry. The red is intense enough that it can stand to lose a bit.


Back onto the burner it goes. Stir the fennel and garlic and fry until golden. 

I like my gnocchi seared, and next time, I'll remove the vegetables when they've caramelized, since frying the gnocchi goes a touch longer than it takes to burn the veg.

At this point, I remembered that I have some spiced pork fat that was rendered from a dish at work. I added three tablespoons to the pot with the vegetables and let it heat up. Bacon fat works too, as does more olive oil or butter, though those last two will burn faster.

If I remember right, the spices in the fat were fresh rosemary, dried thyme, chili flakes, and dried oregano. I'd recommend adding a quarter teaspoon of each straight into the hot oil before the gnocchi.

Generally, with potato gnocchi, they're cooked through once they float to the surface of the water. These beet ones are a bit more dense, so they need an extra 10 seconds or so on the boil after they float. Once they do, transfer them straight to the hot oil/fat.


I let the gnocchi sit undisturbed for 1-2 minutes on medium-high heat. After that, they should be easier to remove from the bottom of the pot with a rigid metal or wood spatula. Stir frequently to coat with the oil and any added spices.

As soon they begin to display small, bright red blisters, they're done. 


Taste a gnocchi and decide if it needs salt. Mine did. Throw in parsley, a pinch of salt, and a squeeze of lemon. 


I decided that it needed cheese. I have this really soft, salty, Macedonian feta that I love putting in salads, and it was great in here. If I had balsamic vinegar in the cupboard, there would have been a drizzle of that on top, too. 


Great for cloudy days. 

Tuesday, January 30, 2018

Peach and Blackberry Shortbread Cobbler

Last summer, my bike commute ran past a veritable wall of blackberry bushes. 
Over the course of two months, I picked around 8 litres of blackberries. I did make a couple of pies over the summer and fall, but I froze most of the berries for the winter. 


Which is now. Today, I made this:


Peach and Blackberry Cobbler with Spiced Hazelnut-Pistachio Shortbread. At what point are you supposed to stop naming ingredients in the title of a recipe? Anyway. 

I make this a lot, because I'm not a fan of the more biscuit-like toppings on traditional cobblers. It's based on this recipe from Fine Cooking. 

I also froze just-on-the-edge-of-rotting peaches. Blanched, peeled, and sliced before freezing so I could throw them right into a colander with the blackberries, like this:


I'd say there's five cups of frozen fruit in there, but it sinks down to three with all the moisture it loses during maceration and thawing. 

I want the fruit filling completely thawed before it goes in the oven, but I like mixing the sugar/spices in while the individual bits of fruit are still frozen, so everything can get evenly distributed and I don't mash the fruit to a pulp. Putting the mix in a strainer collects all the juice that drips out, which I also use. But that's for later. 

A quarter-cup of sugar, tablespoon of lemon zest, a cut-up vanilla bean, and a teaspoon of kosher salt go into the frozen filling. 


Mixed up!


Now the topping. Starting here with a half-cup each of butter and brown sugar in the pot.


I do not have an electric mixer of any kind. I could get one, but then I think I'd go bankrupt from making too many desserts, so it's best to keep it the way it is. 

Mixing by hand is not fun, though. That "light and fluffy" stage of creaming butter and sugar together rarely happens in my house. 

This is as good as it gets. 


With the addition of three egg yolks...


...And also flour, finely ground toasted hazelnuts and pistachios, baking powder, salt, cinnamon, ginger, and nutmeg.


Fully mixed in:


What is now essentially cookie dough gets dumped onto plastic wrap (or in my case a large ziplock because I don't have any). 


Trying to just touch the plastic, roll the dough into a log. Kinda like sushi? After rolling up, tie the ends and throw it in the freezer for two hours.


This is what the filling looks like after thawing. 


The red liquid on the right is the blackberry and peach juice, plus a bit of the sugar, lemon, and salt in the filling, which drained out as everything came up to room temperature. I boil this down into syrup, which you can put on top of ice cream on top of the cobbler. Or just eat with a spoon, whatever. 


After not-quite-two-hours because I am very impatient, here's what the cookie-log looks like after slicing, about a half-inch per slice.


These get placed on top of the peaches and blackberries...


...And baked for 30ish minutes at 375 until the cookies display cracks on top and start to brown. 
Summer in the middle of winter, ta-daaaaaaaaaaaa.


Okay, so winter here isn't that bad, but still.